Step-by-Step Guide to Model Training and Deployment with MLFlow, FastAPI, and Docker
Anatolii Kostin
Published on Wednesday, Sep 24, 2025
Shipping machine learning models into production requires more than just a good offline score. You need reproducible training, experiment tracking, a predictable serving layer, and a reliable deployment process. This guide demonstrates a pragmatic workflow that ties these pieces together using:
- MLFlow for experiment tracking and artifact management
- FastAPI for lightweight, high-performance model serving
- Docker (and docker-compose) for packaging and deploying the service
All code is available in this Github repository. The repository contains a full example: model training that saves model artifacts and MLFlow run data, a FastAPI app exposing a prediction API with API-key authentication, and a Docker image to run the app. Use this as a template you can adapt to your model and infra.
Outline
- Data and training: load data, train an XGBoost regressor, and log parameters/metrics + artifacts to MLFlow.
- Serving: FastAPI app that loads model artifacts, enforces API key auth, and exposes a
/price/predictendpoint and a/healthendpoint. - Packaging & deployment: Dockerfile, docker-compose, healthcheck and how to run locally or in containers.
- Verification & production tips: healthchecks, CI/CD, monitoring, security, and scaling.
1 — Data and training (reproducible + tracked)
Goal: Train a model, log parameters & metrics, and save the trained model and any pre-processing artifacts (e.g., encoder) in a reproducible way.
Relevant files in the repository:
app/data/train.csv— training datasetapp/train_model.py— training scriptsapp/model/artifacts/— wheremodel.pklandencoder.pklare savedapp/steps/- where main functions for data loading, transformation, model training and saving are storedmlruns/— MLFlow local tracking store (created by MLFlow runs)
Key ideas:
- Use MLFlow to log params, metrics, and artifacts so runs are reproducible and inspectable.
- Save model and encoder into
model/artifacts/(and optionally register in MLFlow model registry).
Model training example
# app/train_model.py
from pathlib import Path

from steps.load import load
from steps.save import save_model
from steps.train import train_xgb
from steps.transform import transform

# This ensures the script finds the data file even when run from a different working directory.
INPUT_FILE = Path(__file__).resolve().parent / "data" / "train.csv"


def main():
    """Execute the ML training pipeline."""
    try:
        print("Loading data...")
        df = load(INPUT_FILE)

        print("Transforming data...")
        df = transform(df)

        print("Training model...")
        model, encoder, predictions = train_xgb(df)

        print("Saving model...")
        save_model(model, encoder)

        print("Pipeline completed successfully!")

    except Exception as e:
        print(f"Pipeline failed with error: {e}")
        raise


if __name__ == "__main__":
    main()
Notes:
- This snippet shows main model training pipeline steps:
load,transform,train_xgb,save_model - Every script execution saves MLFlow runs into
app/mlruns/folder for experiment tracking purposes - Latest
model.pklandencoder.pklfiles are also getting saved intoapp/model/artifacts/folder to be used by FastAPI app
Model training script
This script takes transformed data, runs model training and saves model parameters, metrics and artifacts in MLFlow run execution.
# app/steps/train.py
from pathlib import Path

import category_encoders as ce
import mlflow
from mlflow.models import infer_signature
from sklearn.metrics import mean_absolute_error, mean_squared_error, r2_score
from sklearn.model_selection import train_test_split
from xgboost import XGBRegressor as xgbr

ARTIFACT_DIR = Path("model/artifacts")
ARTIFACT_DIR.mkdir(parents=True, exist_ok=True)


def train_xgb(df):
    features = [
        "LotArea",
        "Neighborhood",
        "BldgType",
        "HouseStyle",
        "OverallQual",
        "OverallCond",
        "YearBuilt",
        "CentralAir",
        "GrLivArea",
        "FullBath",
        "HalfBath",
        "BedroomAbvGr",
        "TotRmsAbvGrd",
        "GarageType",
        "GarageCars",
        "MoSold",
        "YrSold",
    ]
    target = "SalePrice"

    # Split features and target value (house SalePrice)
    X_data = df[features]
    Y_data = df[target]

    # Split data on the train and test datasets
    print("Splitting data into train and test datasets...")
    x_train, x_test, y_train, y_test = train_test_split(X_data, Y_data, test_size=0.2, shuffle=True, random_state=42)

    print(f"No. of training examples: {x_train.shape[0]}")
    print(f"No. of testing examples: {x_test.shape[0]}")

    # Count Encoding
    print("Applying Count Encoding...")
    encoder = ce.CountEncoder(return_df=True)
    x_train_loo = encoder.fit_transform(x_train, y_train, normalize=True)
    x_test_loo = encoder.transform(x_test)

    # Create a new MLflow Experiment
    mlflow.set_experiment("House Price Prediction")

    with mlflow.start_run():
        params = {
            "objective": "reg:squarederror",
            "n_jobs": 8,
            "colsample_bytree": 0.7,
            "tree_method": "exact",
            "learning_rate": 0.05,
            "max_depth": 9,
            "n_estimators": 1000,
            "random_state": 42,
        }

        mlflow.log_params(params)

        # XGboost Regressor
        print("Training XGBoost Regressor...")
        model = xgbr(**params)
        model.fit(x_train_loo, y_train)

        print("Model training completed.")
        print("Evaluating model on test data...")
        predictions = model.predict(x_test_loo)

        r2 = r2_score(y_test, predictions)
        mse = mean_squared_error(y_test, predictions)
        mae = mean_absolute_error(y_test, predictions)

        mlflow.log_metric("r2_score", r2)
        mlflow.log_metric("mean_squared_error", mse)
        mlflow.log_metric("mean_absolute_error", mae)

        print("Model R^2 Score on test data", (r2 * 100), "%")
        print("Model Mean Square Error on test data", mse)
        print("Model Mean Absolute Error on test data", mae)

        # Infer the model signature
        signature = infer_signature(x_train_loo, predictions)

        # Log the model, which inherits the parameters and metric
        model_info = mlflow.xgboost.log_model(
            xgb_model=model,
            name="house_price_model",
            signature=signature,
            input_example=x_train_loo[:1],
            registered_model_name="tracking-house-price-model",
        )

        # Set a tag that we can use to remind ourselves what this model was for
        mlflow.set_logged_model_tags(model_info.model_id, {"Training Info": "Basic XGBR model with Count Encoding"})

        mlflow.log_artifact(ARTIFACT_DIR / "model.pkl", artifact_path="artifacts")
        mlflow.log_artifact(ARTIFACT_DIR / "encoder.pkl", artifact_path="artifacts")

    return model, encoder, predictions
Notes:
- This snippet shows core MLFlow actions:
start_run(),log_params(),log_metric(), andlog_artifact(). - In this repo, training logic lives under
app/steps/train.py. - Model training
paramsare getting saved in MLFlow database alongside modelmetricsfor experiment tracking and reproducibility.
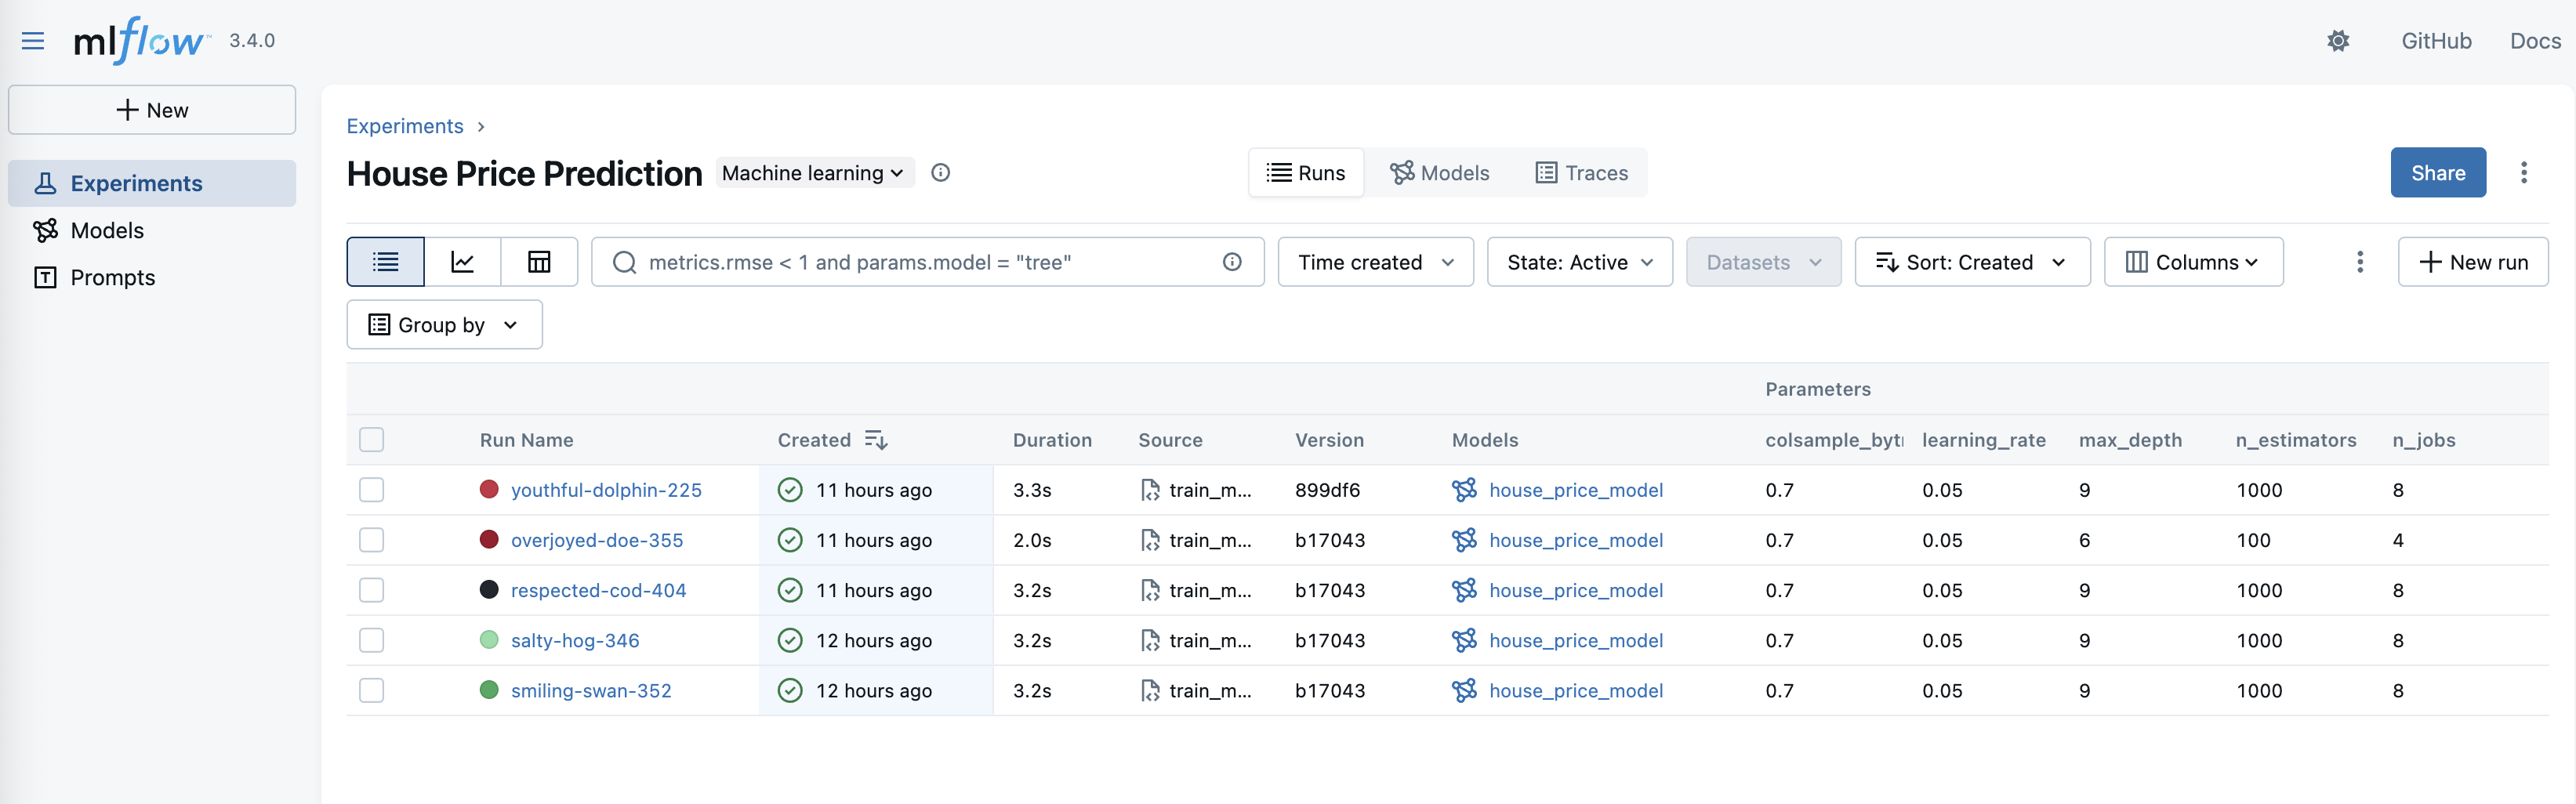
MLFlow experiments
To access MLFlow experiments UI, run the following command in app/ folder:
mlflow ui --port 5000
Then open http://127.0.0.1:5000 in the browser.
Navigate to Experiments -> House Price Prediction to get a list of your experiments.
2 — Serving with FastAPI (load artifacts + protect endpoints)
Goal: Provide an API to accept JSON feature vectors, apply preprocessing, and return predictions. Protect endpoints with a simple API key header for quick auth.
Relevant files in the repository:
app/main.py— FastAPI application entrypointapp/steps/predict.py— prediction helper that applies encoder and modelDockerfile— how the image is builtdocker-compose.yaml— how containers are wired
Essential serving pattern:
- On startup: load
encoder.pklandmodel.pklfrommodel/artifacts. - Provide a
/healthendpoint used by container healthchecks. - Provide a
/price/predictendpoint that requires headerX-API-Key. - Validate input, transform using the saved encoder, and output prediction in JSON.
FastAPI app:
# app/main.py
import os
from secrets import compare_digest

from fastapi import Depends, FastAPI, HTTPException, Security, status
from fastapi.security import APIKeyHeader
from fastapi.security.api_key import APIKey
from pydantic import BaseModel
from steps.predict import predict

# read API_KEY env variable
API_KEY = os.getenv("API_KEY")
if not API_KEY:
    raise ValueError("API_KEY environment variable is not set")

# Get API key from header
api_key_header = APIKeyHeader(name="X-API-Key")


# API key authentication method
def api_key_auth(api_key_header: str = Security(api_key_header)):
    if not compare_digest(api_key_header, API_KEY):
        raise HTTPException(status_code=status.HTTP_401_UNAUTHORIZED, detail="Forbidden")


app = FastAPI()


class HouseDetails(BaseModel):
    LotArea: int
    Neighborhood: str
    BldgType: str
    HouseStyle: str
    OverallQual: int
    OverallCond: int
    YearBuilt: int
    CentralAir: int
    GrLivArea: int
    FullBath: int
    HalfBath: int
    BedroomAbvGr: int
    TotRmsAbvGrd: int
    GarageType: str
    GarageCars: int
    MoSold: int
    YrSold: int


class PredictedPrice(BaseModel):
    price: float


@app.get("/health", status_code=status.HTTP_200_OK)
async def health_check():
    return {"status": "ok"}


@app.post("/price/predict", response_model=PredictedPrice, status_code=status.HTTP_200_OK)
def get_prediction(payload: HouseDetails, api_key: APIKey = Depends(api_key_auth)):
    try:
        prediction = predict(dict(payload))
    except Exception as e:
        raise HTTPException(status_code=status.HTTP_500_INTERNAL_SERVER_ERROR, detail=f"Prediction failed: {str(e)}")
    else:
        if not prediction:
            raise HTTPException(
                status_code=status.HTTP_500_INTERNAL_SERVER_ERROR, detail="Prediction failed: empty result."
            )

        return {"price": prediction}
Notes:
- Reuse the preprocessing code in
app/steps/predict.pyto avoid mismatch between training and serving. - Pydantic models give request validation and nicely formatted docs at
/docs.
API auth:
- The repo uses a basic API key via header
X-API-Keywhich gets compared withAPI_KEYenvironment variable.
Example curl request:
curl -X 'POST' \
  'http://localhost:3001/price/predict' \
  -H 'accept: application/json' \
  -H 'Content-Type: application/json' \
  -H 'X-API-Key: <apikey>' \
  -d '{
        "LotArea": 8450,
        "Neighborhood": "CollgCr",
        "BldgType": "1Fam",
        "HouseStyle": "2Story",
        "OverallQual": 7,
        "OverallCond": 5,
        "YearBuilt": 2003,
        "CentralAir": 1,
        "GrLivArea": 1710,
        "FullBath": 2,
        "HalfBath": 1,
        "BedroomAbvGr": 3,
        "TotRmsAbvGrd": 8,
        "GarageType": "Attchd",
        "GarageCars": 2,
        "MoSold": 2,
        "YrSold": 2008
    }'
Expected response:
{
  "price": 207887.015625
}
3 — Packaging with Docker and docker-compose
Goal: Build a reproducible image that contains the app and the runtime dependencies and exposes the FastAPI service.
Important files:
Dockerfiledocker-compose.yamlrequirements.txt.env(can be created from.env.sample)
Key Dockerfile excerpt (present in the project):
FROM python:3.13.7-slim

# Create non-root user
RUN groupadd -r appuser && useradd -r -g appuser appuser

WORKDIR /app

COPY requirements.txt .
RUN pip install --upgrade pip && pip install --no-cache-dir -r requirements.txt

COPY ./app .

RUN chown -R appuser:appuser /app
USER appuser

ENV PYTHONDONTWRITEBYTECODE=1
ENV PYTHONUNBUFFERED=1

EXPOSE 3001

CMD ["python", "-m", "uvicorn", "main:app", "--host", "0.0.0.0", "--port", "3001"]
docker-compose excerpt:
services:
  ml-api:
    platform: linux/amd64
    image: ml-home-price-predict:latest
    build:
      context: .
      dockerfile: Dockerfile
    ports:
      - 3001:3001
    env_file: ".env"
    healthcheck:
      test: [ "CMD", "python", "-c", "import urllib.request, sys; sys.exit(0 if urllib.request.urlopen('http://localhost:3001/health').status == 200 else 1)" ]
      interval: 60s
      timeout: 30s
      retries: 3
      start_period: 60s
How to build and run locally:
- Build image:
docker compose build
- Run:
docker compose up
Notes:
- The Dockerfile copies the
appfolder into the image. Ensuremodel/artifacts/*exists in theappfolder before building (or mount a volume at runtime) so the container can load the model. - Use an
.envfile referenced bydocker-compose.yamlto provideAPI_KEYand other secrets. Do not commit real secrets to the repo. - For production Docker deployments add
API_KEYenvironment variable using methods available by a hosting provider.
4 — Verification & production tips
Smoke tests
- After container starts, verify:
- GET
http://localhost:3001/healthreturns 200 - POST
http://localhost:3001/price/predictwith valid API key returns a numeric price
- GET
- Use
/docsto manually test in the browser.
CI/CD suggestions
- Build image in CI, run unit tests and linters, then push the image to a registry.
- Automate training + artifact promotion: when new data arrives or scheduled retraining runs, store artifacts in a central artifact store and trigger a deployment pipeline that pulls the new model.
Monitoring & observability
- Log prediction latency, input sizes, request rates and error rates.
- Store prediction request summaries to detect data drift and trigger retraining.
Security
- Use secrets managers for API keys; rotate keys regularly.
- Add rate limiting and authentication (JWT/OAuth2) for public APIs.
Scalability
- Scale horizontally with multiple containers behind a load balancer.
- Warm up containers or use a dedicated model server for large models.
5 — Quick checklist & commands
Build image:
docker compose build
Run containers:
docker compose up
Test health:
curl http://localhost:3001/health
Test predict (replace <apikey>):
curl -X POST 'http://localhost:3001/price/predict' \
  -H 'accept: application/json' \
  -H 'Content-Type: application/json' \
  -H 'X-API-Key: <apikey>' \
  -d '{"LotArea":8450, "Neighborhood":"CollgCr", "BldgType":"1Fam", "HouseStyle":"2Story", "OverallQual":7, "OverallCond":5, "YearBuilt":2003, "CentralAir":1, "GrLivArea":1710, "FullBath":2, "HalfBath":1, "BedroomAbvGr":3, "TotRmsAbvGrd":8, "GarageType":"Attchd", "GarageCars":2, "MoSold":2, "YrSold":2008}'
6 — Next steps and improvements
- Replace ad-hoc preprocessing with a single scikit-learn
Pipelinethat is saved and loaded alongside the model so training and serving use the exact same transforms. - Add unit tests for prediction logic and wire them into CI.
- Use a managed MLFlow tracking server or shared backend store for team collaboration.
- Add model versioning and an automated promotion process from staging to production.